
| 일 | 월 | 화 | 수 | 목 | 금 | 토 |
|---|---|---|---|---|---|---|
| 1 | 2 | 3 | 4 | 5 | 6 | |
| 7 | 8 | 9 | 10 | 11 | 12 | 13 |
| 14 | 15 | 16 | 17 | 18 | 19 | 20 |
| 21 | 22 | 23 | 24 | 25 | 26 | 27 |
| 28 | 29 | 30 | 31 |
- 피리티어
- 바이트코드
- spring-security
- https
- 이펙티브 자바
- error
- java
- ec2
- Spring
- AWS
- 보안 그룹
- Annotation
- exception
- try-with-reources
- Unchecked Exception
- Final
- 예외
- Checked Exception
- JVM
- Effective Java
- 생각정리
- 자바스터디
- bytecode
- 자바
- RDS
- springboot
- 파라미터 그룹
- 이펙티브자바
- Today
- Total
개발 일지
자바 스터디 4주 차 발표 자료입니다.
https://github.com/WanOnPreStudy/JavaQuestionStudy
GitHub - WanOnPreStudy/JavaQuestionStudy: 백엔드 자바 질문 스터디
백엔드 자바 질문 스터디. Contribute to WanOnPreStudy/JavaQuestionStudy development by creating an account on GitHub.
github.com
들어가기 전에
- try-with-resoures란 사용한 자원을 자동으로 close 해주는 문법입니다.
- 자바 라이브러리에는 사용하고 직접 close 해줘야 하는 자원들이 많습니다.
- InputStream, OutputStream, java.sql.Connection 등등
- 자원들을 사용하고 close 해주지 않으면 예측할 수 없는 성능 문제로 이어질 수 있습니다
- close를 보장하는 수단으로 try-finally문을 사용했었는데 try-finally문에는 문제점이 존재했고
- 문제점을 해결하기 위해 자바 7에서 try-with-resource가 나왔습니다.
try-finally
아래 코드는 파일의 첫 줄을 읽어오는 간단한 try-finally문입니다.
    static String firstLinOfFile(String path) throws IOException {
        BufferedReader br =new BufferedReader(new FileReader(path));
        try {
            return br.readLine();
        } finally {
            br.close();
        }
    }
두 개 이상의 자원을 사용하면 코드는 더욱 복잡해집니다.
    static void copy(String src, String dst) throws IOException {
        InputStream in = new FileInputStream(src);
        try {
            OutputStream out = new FileOutputStream(dst);
            try{
                byte[] buf = new byte[BUFFER_SIZE];
                int n;
                while ((n=in.read(buf))>=0)
                    out.write(buf, 0, n);
            } finally {
                out.close();
            }
        } finally {
            in.close();
        }
    }
위 코드에는 결점이 있습니다. 이래는 이펙티브 자바에 나오는 내용입니다.
예외는 try 블록과 finally 블록 모두에서 발생할 수 있는데, 예컨대 기기에 물리적인 문제가 생긴다면 firstLineOfFile 메서드 안의 readLine 메서드가 예외를 던지고, 같은 이유로 close메서드도 실패할 것이다. 이런 경우에 두 번째 예외가 첫 번째 예외를 완전히 집어삼키게 된다. 그러면 스택 추적 내역에 첫 번째 예외에 관한 정보는 남지 않게 되어, 실제 시스템에서의 디버깅을 몹시 어렵게 한다.
기기의 물리적으로 문제를 발생시킬 수는 없으니 임의로 예외를 던지는 예제를 만들어서 확인해 보겠습니다.
public class FirstException extends RuntimeException{
}
public class SecondException extends RuntimeException{
}RuntimeException을 상속한 FirstException과 SecondException 클래스를 만들고
public class MyResource {
    public void doSomething() throws FirstException{
        System.out.println("doing something");
        throw new FirstException();

    }
    public void close() throws SecondException{
        System.out.println("my resource Close");
        throw new SecondException();
    }
}
MyResource클래스에서 위에서 만든 예외를 던지는 코드를 작성합니다.
public class AppRunner {

    public static void main(String[] args) {
        MyResource myResource = new MyResource();
        try{
            myResource.doSomething();   // FirstException 발생
        } finally {
            myResource.close();         // secondException 발생
        }
    }
}
AppRunner 클래스를 실행시켜 보겠습니다.
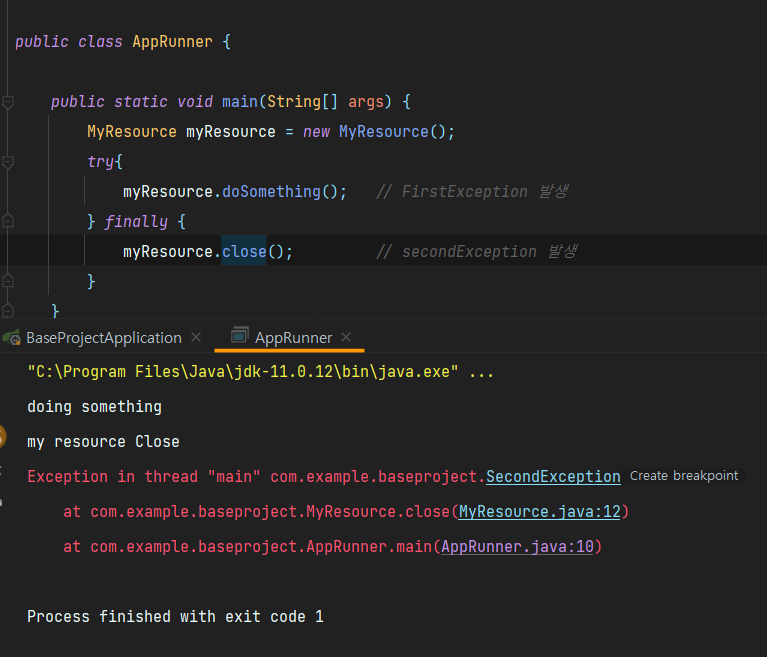
위에 코드를 보면 doSomething()에서 첫 번째 예외가 발생했음에도 불구하고 close()에서 발생한 두 번째 예외만 스택에 쌓여 있는 것을 확인할 수 있습니다. 이렇게 되면 처음 예외가 발생한 곳을 알지 못하기 때문에 디버깅이 어렵습니다.
이번에는 똑같은 코드를 try-with-resources 문으로 구현해 보겠습니다.
try-with-resources
try-with-reources 구문은 try(...) 안에 try 블록에서 사용할 리소스를 생성하면 try 문을 벗어나고(try 블록에서 예외가 발생하든 발생하지 않든) try(...) 안에 생성한 리소스를 자동으로 close 해줍니다. 그렇기 때문에 finally에서 명시적으로 close 메서드를 호출해줄 필요가 없습니다.
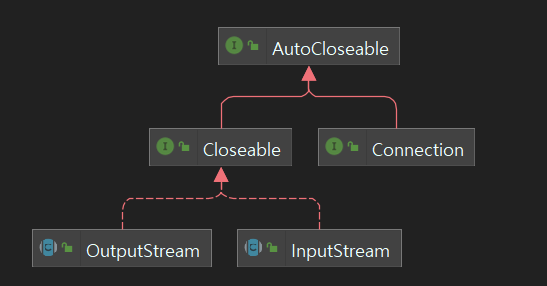
try-with-reources 구문에서 자동으로 자원을 close 해주려면 해당 자원(resource)이 AutoCloseable 인터페이스를 구현해야 합니다. AutoCloseable은 단순히 void를 반환하는 close메서드 하나만 정의되어있는 인터페이스입니다.
코드에 적용시켜 보겠습니다.
public class MyResource implements AutoCloseable{

    public void doSomething() throws FirstException{
        System.out.println("doing something");
        throw new FirstException();

    }

    @Override
    public void close() throws SecondException{
        System.out.println("my resource Close");
        throw new SecondException();
    }
}
FirstExceprion, SecondException 클래스는 그대로 두고 다음과 같이 MyResource 클래스에서 AutoCloseable 인터페이스 implement 하고 close 메서드를 오버라이드 하였습니다.
AppRunner는 다음과 같이 클래스를 작성할 수 있습니다.
public class AppRunner {

    public static void main(String[] args) {
        try (MyResource myResource = new MyResource()) {
            myResource.doSomething();   // FirstException 발생
        }
        // 자동으로 close() 실행 (secondException 발생)
    }
}
위에서 설명한 것처럼 try(...) 안에 myResourece를 생성하면 try 블록이 끝나고 자동으로 close 해주기 때문에 finally에서 close메서드를 호출해주지 않아도 됩니다.
실행해 보겠습니다.
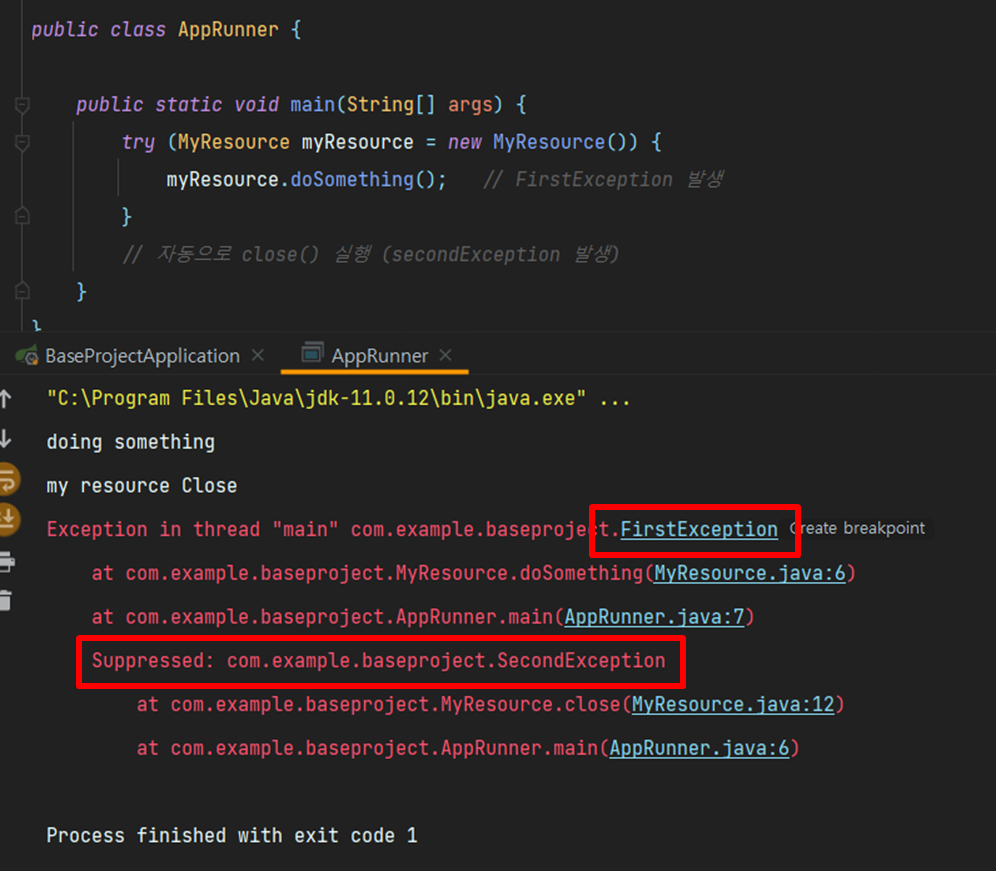
try-finally문과는 다르게 첫 번째 예외를 보여주고 그 밑으로 두 번째 예외를 보여주는 것을 확인할 수 있습니다. 이렇게 되면 예외의 시작점을 알 수 있어서 디버깅이 훨씬 용이해집니다.
위에서 두 개의 자원을 사용한 try-finally예제도 try-with-reources 사용하면 간단해집니다.
    static void copy(String src, String dst) throws IOException {
        try (InputStream in = new FileInputStream(src); OutputStream out = new FileOutputStream(dst)){
                byte[] buf = new byte[BUFFER_SIZE];
                int n;
                while ((n = in.read(buf)) >= 0)
                    out.write(buf, 0, n);
            }
    }
위에 예제에서 try-with-reources문을 사용하기 위해 MyResource 클래스에 AutoCloseable 인터페이스를 구현했었는데 대부분의 자바의 라이브러리와 서드파티 라이브러리들이 AutoCloseable을 이미 구현하거나 확장해 놓았기 때문에 명시적으로 close을 해줘야 하는 자원들은 바로 try-finally 대신 try-with-reources을 사용할 수 있습니다.
또한 try-with-reources에서도 catch 절을 쓸 수 있어서 try문을 중첩하지 않고도 다수의 예외를 처리할 수 있습니다.
정리
- try-finally 대신 try-with-reources을 사용하자
- 에러 스택 누락, 실수나 에러로 자원 close 못함, 자원 반납에 의해 코드가 복잡해짐 등등의 문제점을 해결할 수 있다
Reference
- 이펙티브 자바 아이템 9 "try-finally 보다는 try-with-resources를 사용하라"
- https://www.youtube.com/watch?v=zqjZBSqHs0s
'Java' 카테고리의 다른 글
| [Java] Annotation (0) | 2022.11.23 |
|---|---|
| [Java] 바이트 코드(2) :: 바이트 코드 예제 (0) | 2022.11.13 |
| [Java] 바이트 코드(1) :: 바이트 코드란? (1) | 2022.11.10 |
| [Java] Checked Exception, Unchecked Exception, Error (0) | 2022.11.07 |
| [Java] final 키워드 (0) | 2022.11.04 |


